
|
The Resource Plan exists within the context of a workspace. To view the Resource Plan, navigate to the Projects tab and select any workspace. In the workspace navigation menu, under the Resources menu item, select the view named Resource Plan.
Display Controls
Header Bar
Along the top of the Resource Plan screen is a Header Bar, which contains the Search Filter and access to actions that affect the state or display of the entire plan.
To use the Search Filter, the user types in the name of a resource or resource type. The filter will hide any rows that do not match the user's input. Additionally, if a user searches for a specific resource, other resources of the same type will also be displayed so the allocations can be viewed in the context of the entire requirement.
Note: The action controls in the Header Bar will only affect rows that are currently visible in the Resource Plan. Hidden rows will not updated or submitted for approval. The only Header Bar action that affects hidden row is the saving. In Edit Mode, clicking Save will save all changes made to the plan regardless of visibility.
The Header bar also provides visual cues to help the user understand the context of information they see on the screen. For example, the formatting of the dates shown in the column headers changes according to these rules:

|
The current time period is displayed in colored text on a white background. |

|
Time periods in the past appear in grey italic text. |

|
Time periods in the future appear in black text on a white background. |

|
Time periods outside the Planned Start/Planned Finish for the project appear on a grey background. |
Footer Bar
The Footer Bar running along the bottom of the Resource Plan contains the Display Menu and the Timeline. The Display Menu controls which columns are displayed in the plan and the Timeline allows users to jump to specific points in life of the project. The options in the Display Menu are listed below:
| Display Option | Description |
| Allocation | Allocations are displayed. This option cannot be unselected. |
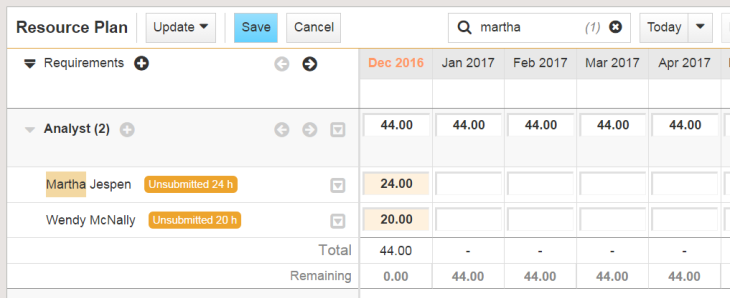
| Unsubmitted | Unsubmitted Allocations. Allocations with no submitted resource request are displayed in orange. Even when this option is not selected, the Resource Plan will display an orange dot next to requirements with unsubmitted allocations. For more information about this option, see Viewing Unsubmitted Allocations. |
| Pending | Pending Allocations. Allocations with pending resource requests are displayed in blue. Even when this option is not selected, the Resource Plan will display a blue dot next to requirements with unsubmitted allocations. For more information about this option, see Viewing Pending Allocations. |
| Scheduled | Scheduled Allocations. Allocation scheduled for a task are displayed in light green. For more information about this option, see Viewing Scheduled Allocations. |
| Actual | Actual Allocations are displayed in purple. For more information about this option, see Viewing Actual Hours. |
| Availability | The resource’s available hours are displayed in dark green. For more information about this option, see Viewing Available Hours. |
Requirements, Resources, And Allocations
The primary purpose of the Resource Plan screen is to provide access to the Resource Type Requirements and Resource Allocation information. This data is displayed in the main body of the screen.
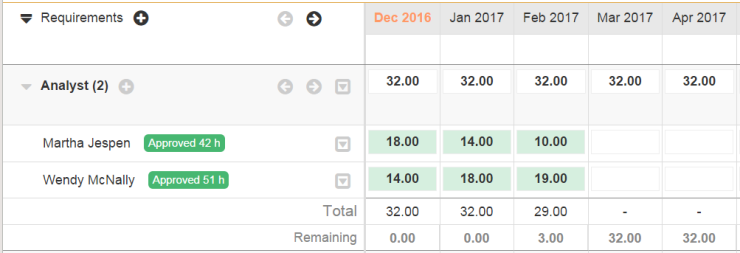
Requirement lines are displayed with a lightly colored background and the name of the required Resource Type in the left column. Across the screen, the Hours or FTEs required for that resource type are displayed within each time period.
Below the requirement values is a “Total” line displaying the sum total hours/FTE for all allocations under the requirement.
Directly beneath the requirement line, with a white background, are lines containing the resource allocations. The resource’s name appears in the left column. (Note: For allocation requests which do not yet have a specific named resource, the name of the Resource Manager to whom the request will be sent is displayed in the left column instead.) Across the screen, within each time period displayed in the Plan, are the Hour or FTE allocations for that resource for the given time period. Note that this value is the sum total of all allocation hours within the time period, including time that has not yet been sent to the Resource Manager or is still pending approval or response from the Resource Manager.
At the bottom of each requirement block, is a “Remaining” line that shows the difference between the requirement hours and the total allocation hours within each time period.
As the mouse moves across the Resource Plan, the requirement or allocation line directly beneath the mouse will become highlighted. Additional controls will appear next to the Resource Type or Resource name. These control options are context sensitive, and show which user actions are currently allowed for that line depending on the state of the plan. The specific use of each of these controls is provided in the User Actions section.
Edit Mode
Many actions, including entering new data into a Requirement or Allocation cell in the plan, or adding new requirements or resources, put the Resource Plan into an “Edit Mode”. All changes in Edit Mode are local to the user and are not actually committed to the system until the user clicks the Save button at the top of the screen.
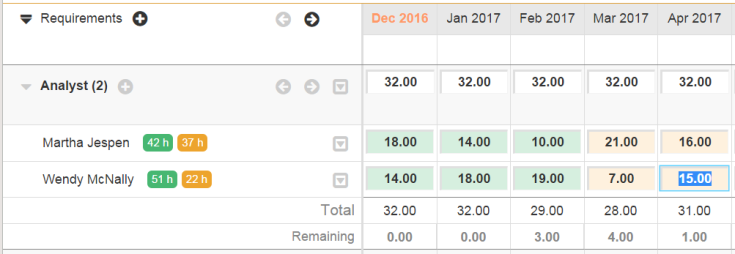
While in Edit Mode, a blue box appears around the currently-selected cell in the Resource Plan. This is the field into which any new values will be entered. The screen supports standard mouse and keyboard controls to change the selected cell:
While in Edit Mode, two new buttons appear at the top of the screen:
If the user attempts to navigate away from the Resource Plan screen after making changes to the data without selecting either “Save” or “Cancel”, the system will display a warning that all changes may be lost. The user is prompted to stay on the page and complete their edit or continue with the navigation change.
Advanced Input Mode
You can quickly distribute allocations across Resource Plan rows using the Advanced Input Mode. Entering special commands automatically activates the Advanced Input Mode, allowing users to reduce the time they spend allocating the same number of hours across multiple cells in a row. With this feature, you can either copy a value across multiple cells or divide hours evenly across multiple cells.
To copy a value across multiple cells:
The initial value entered will be copied across the number of cells specified.
To evenly divide a number of hours across multiple cells:
The initial value entered will be divided evenly across the number of cells specified.
Permissions
There are three workspace level permissions that control access to specific functionality in the Resource Plan. These can be enabled or disabled on individual roles for the given workspace type.

Related Topics: